The Smart Choice System allows administrators to create custom reports within the Report Builder. Upon clicking on the REPORTS icon, administrators will be presented with all existing and global reports in a table format by report name with the ability to search by name, add a new report, view an existing report, and or edit an existing report.
*Please note that all systems do not include this functionality.
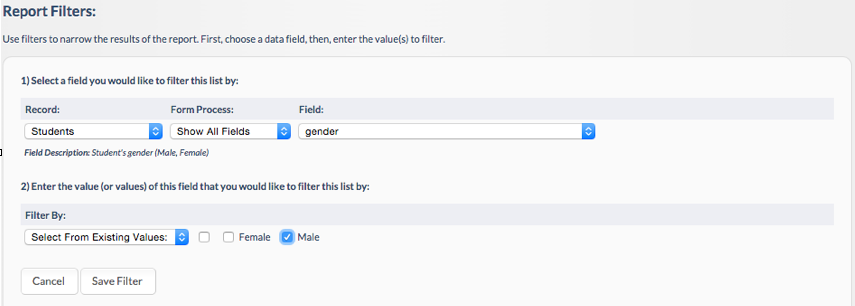
When the administrator clicks on the "Add New Report" button to the right of the screen, they will be prompted first with the ability to update the Report Filters. Be mindful that building out reports requires extensive knowledge of the forms, form fields, and more. Please reference your forms in SETTINGS>>MANAGE FORMS while building out reports.
Report Filters
Here you will determine what fields your custom report will filter based on. You will use filters to narrow the results of the report. First, choose a data field, then, enter the value(s) to filter.
- Record
- Students - This record will hold most of the student demographic information like name, dob, gender, etc.
- Applications - This record will hold program-specific information, like details on recommendations, eligibility status by the program, and more.
- Parents - This record will hold information relevant to the parent account, like parent name, parent account ID, and email address.
- Lottery Rankings - This record will hold information specific to placement details for each choice, accept/decline details, and more.
- Flags - This record will hold information specific to application flags and reasonings.
- Siblings - This record will hold information specific to sibling information entered into the application and more.
- Form Process
- Form Process Name - If your system utilizes multiple form processes for different programs this drop-down will be populated with all form processes by name.
- Field Name - This dropdown will showcase all fields that are in the RECORD and FORM PROCESS selected in the previous 2 dropdowns.
- Filter By - This drop-down allows you to enter the value (or values) of this field that you would like to filter this list by.
- Select from existing values - This will most likely be the widest used option as it will showcase the existing values in the selected field removing the guesswork.
- Date Range - This will allow you to use date range menus to filter for fields like submit date etc.
- Grades - This will allow you to select from grade levels accepted when filtering by grade-specific fields.
- Programs - This will allow you to select from a program list when filtering by program-specific fields.
- Schools - This will allow you to select from a school list when filtering by school-specific fields.
- Cities - This will allow you to select from a city list when filtering by city-specific fields.
For example, if you wanted to create a filter in your report to showcase only male students you would want to filter by Student Record>gender>male.
View Frequently Used Fields for Filters.

Display Fields
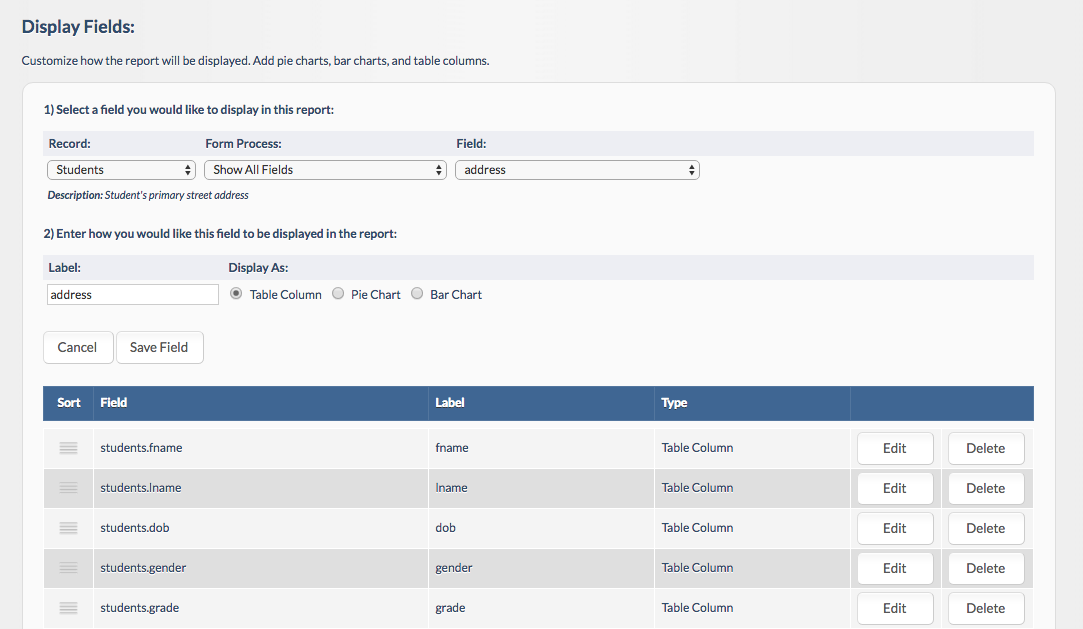
Once you have determined the fields you will be filtering your report by you will then be able to determine which fields you want to show up within the actual report itself.
- Record
- Students - This record will hold most of the student demographic information like name, dob, gender, etc.
- Applications - This record will hold program-specific information, like details on recommendations, eligibility status by the program, and more.
- Parents - This record will hold information relevant to the parent account, like parent name, parent account ID, and email address.
- Lottery Rankings - This record will hold information specific to placement details for each choice, accept/decline details, and more.
- Flags - This record will hold information specific to application flags and reasonings.
- Siblings - This record will hold information specific to sibling information entered into the application and more.
- Form Process
- Magnet Application Process - Your system is only utilizing a single application process so there will most likely only be 1 option to select in this menu at all times.
- Field Name - This dropdown will showcase all fields that are in the RECORD and FORM PROCESS selected in the previous 2 dropdowns.
- Label - This text box will allow you to enter the name of the field as you want it to show up on the actual report. For example, if you want the last name field (name) to show up on the report as “Student’s Last Name” you will enter that exact text into the “Label” text box.
- Display As - This set of radio buttons will allow you to determine how you want the data in the field selected to show up on your final report.
- Table Column
- Pie Chart
- Bar Chart

Report Options
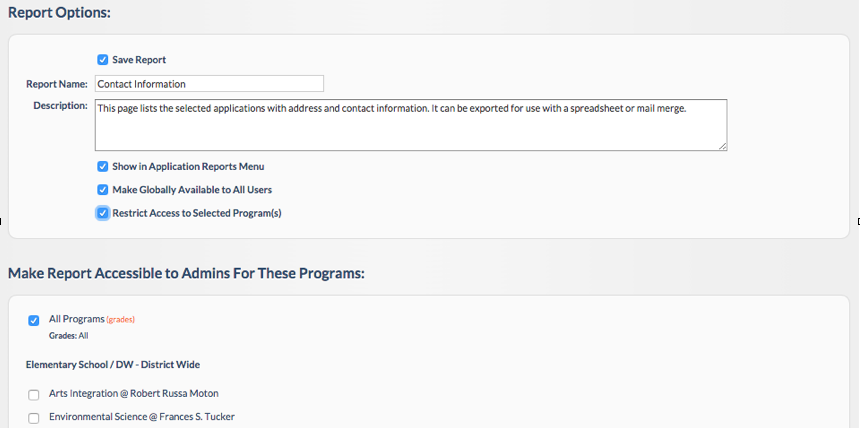
Save Report - By checking this box, the report will be saved for later running and exporting.
Report Name - Here you can enter the descriptive name for the report. This name will be shown in the main reports listing and in the reports menu if you so choose.
Report Description - The description field is for reference only and provides administrators a more detailed account of what the report is based on, what is normally used for etc. It is a free form text box for the report creator to update as needed.
Show in Application Reports Menu - By checking this box, the report is created/saved will show up within the main application management screen’s report drop down to be used along with the filters in the main application management page.
Make Globally Available to All Users- By checking this box, the report is created/saved will be accessible to any/all administrators who have access to view reports.
Restrict Access to Selected Programs - By checking this box, the report creator will be prompted to select specific programs’ admins to provide access to the report in question.

Comments
0 comments
Article is closed for comments.